
Ray Tracing #3: Let's Get Some Actual Rays!
Alright, ready for the third installment of this ray tracing series? This time, we'll get some actual rays, and start tracing them through a scene. Our scene is still going to be empty, but we're starting to get somewhere. Although the book I'm working from is titled Ray Tracing in One Weekend, it's starting to look like my project is going to be more like Ray Tracing in One Year...
Once again, I'm going to put all of the relevant new code for this segment up here, but if you want to see the bits I've missed, check out my GitHub project. We will be circling back to the Vector3 structure I created last time, since I inevitably left out some useful operations...
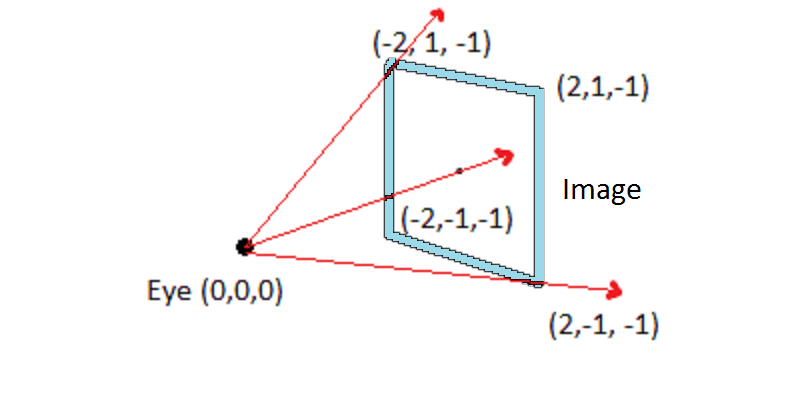
The core of what a ray tracer does is to trace rays from an origin, often called the eye, for obvious reasons, through each pixel in the image, and then out into our scene to whatever objects lie beyond. We don't have any objects to actually hit, yet, but we are going to lay the groundwork to start doing that next time. Below, you can see the setup of our eye, the image plane, and the rays that shoot from the eye through the image and into the scene beyond.
Ray Structure
Before we can shoot any rays, we have to have rays to shoot, so let's build out a data structure to represent one. Rays are pretty simple - they basically consist of an origin point, and a directional vector that specifies which way the ray extends. For now we'll just include one utility method, to calculate the position of a point at a given distance along the ray.
namespace OneWeekendRT.Util {
    public struct Ray {

        public Vector3 Origin { get; private set; }
        public Vector3 Direction { get; private set; }

        public Ray(Vector3 origin, Vector3 direction) : this() {
            Origin = origin;
            Direction = direction;
        }

        public Vector3 Evaluate(float t) { return Origin + Direction * t; }
    }
}
Update Vector3
For this segment, there were a couple of vector operations and properties that I had left out last time that were helpful. The first of these is just another simple factory property, to create a vector with all three components set to 1, named, naturally enough, Vector3.One. The other is a linear interpolation method, that takes two vectors and a percentage, and returns the interpolation between them.
namespace OneWeekendRT.Util {
    using System;

    public struct Vector3 {
        // snip...
        public static Vector3 One { get { return new Vector3(1, 1, 1); } }
        // snip...
        public static Vector3 Lerp(Vector3 a, Vector3 b, float t) {
            return a*(1.0f - t) + b*t;
        }
    }
}
Tracing some rays
Alright, now we're all set to put this together and generate an image. We'll set up our simple "camera" as described in the diagram above, with the camera origin at the world origin, and our image plane at the Z=-1 plane. To make the conversions between world-space and our image dimensions easy, we'll have our image plane window be 4x2. Then, for each pixel in our image, we calculate a UV coordinate, and use that to generate a ray that starts at our camera origin, and goes through this pixel of our image. Since we don't yet have any objects to intersect (next time, I promise...), we will just use that ray to generate a sort of bankrupt-man's skybox, by using the Y-component of the ray's direction vector to create a white-blue linear gradient.
using OneWeekendRT.Util;
using System.Diagnostics;

namespace OneWeekendRT {
    public class Rays {
        public static void Main(string[] args) {
            var bitmap = new Bitmap(400, 200);

            // setup image plane
            var lowerLeftCorner = new Vector3(-2, -1, -1);
            var horizontal = new Vector3(4, 0, 0);
            var vertical = new Vector3(0, 2, 0);
            // setup camera origin
            var origin = Vector3.Zero;

            for (var y = bitmap.Height-1; y >= 0 ; y--) {
                for (var x = 0; x < bitmap.Width; x++) {
                    // calculate image-plane uv coordinates
                    var u = (float)x / bitmap.Width;
                    var v = (float)y / bitmap.Height;
                    // create a ray through the pixel on the image plane
                    var r = new Ray(origin, lowerLeftCorner + horizontal * u + vertical * v);

                    var unit = r.Direction.Normalize();
                    var t = 0.5f * (unit.Y + 1);
                    bitmap[x, y] = Vector3.Lerp(Vector3.One, new Vector3(0.5f, 0.7f, 1.0f), t);
                }
            }
            bitmap.SavePPM("ray.ppm");
            Process.Start("ray.ppm");
        }
    }
}
And voila!

It may not look like much, but things are really about to start moving faster. Next time we'll add in a sphere to intersect our rays against.