Skyboxes and Environmental Reflections using Cube Maps in Direct3D 11 and SlimDX
This time, we are going to take a look at a special class of texture, the cube map, and a couple of the common applications for cube maps, skyboxes and environment-mapped reflections. Skyboxes allow us to model far away details, like the sky or distant scenery, to create a sense that the world is more expansive than just our scene geometry, in an inexpensive way. Environment-mapped reflections allow us to model reflections on surfaces that are irregular or curved, rather than on flat, planar surfaces as in our Mirror Demo.
The code for this example is adapted from the first part of Chapter 17 of Frank Luna’s Introduction to 3D Game Programming with Direct3D 11.0. You can download the full source for this example from my GitHub repository, https://github.com/ericrrichards/dx11.git, under the CubeMap project.
 |
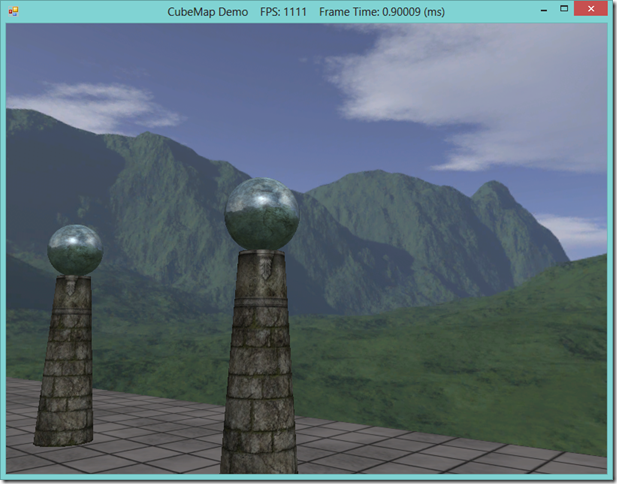
| Our skull & columns scene, with a skybox and environment-mapped reflections on the column tops |
Cube Maps
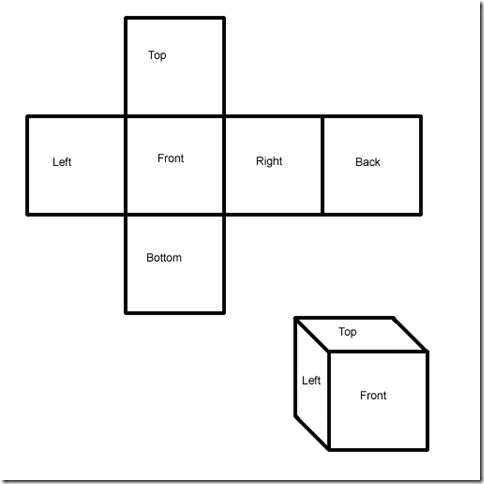
Essentially, a cube map is a texture array of six textures, which are interpreted as the faces of a cube centered on and aligned with a coordinate system. In Direct3D, the textures in the array are laid out, in order, as the [+X, –X, +Y, –Y, +Z, –Z] faces. You can see an unwrapped cube map below:
To sample a cube map, we cannot use 2D UV coordinates as we have with textures so far. Instead, we need a 3D lookup vector, which defines a direction from the cube map origin. The texel sampled from the cube map will be the texel intersected by a ray shot from the origin of the cube-map coordinate system in the direction of the lookup vector. If you’re struggling to understand just what that means, don’t worry (I’ve struggled for nearly 20 minutes to come up with a better way of explaining it…); we will almost never be explicitly specifying cubemap lookup coordinates.
Environment Maps
Most commonly, we will be using cube maps where each face of the cube is a 90 degree FOV view down one of the world space axes, so that the cube map captures the entire scene around the point. These kinds of cube maps are commonly called environment maps. Technically, we should create a separate environment map for each object that we will use environment mapping on, as the surrounding environment will vary per object; however, since (in this example, anyway) we will be using a pre-baked cube map texture for some very distant environment details and leaving out the local geometry, we can fudge it and use just the single cube map for all objects needing environment maps.
Assuming that your pre-baked cube map has been saved correctly as a .DDS cube map, it is dead simple to load the cube map into a shader resource variable, exactly as we have been doing with normal 2D textures.
CubeMapSRV = ShaderResourceView.FromFile(device, filename);
Generating an environment map offline is outside my scope of knowledge, so I’m going to assume that you have some pre-rendered environment maps to work with. I’m using the ones available at Mr. Luna’s website, in the third section of source code for the book. I’ve also seen references to building them using the Terragen tool, but again, I haven’t actually done that myself, and this is not a tutorial on using Terragen…
Skyboxes
To model the sky for our scene, we will generate a sphere, texture it using a cube map, and then render this environment sphere at a fixed offset from the camera position, using some special render states, so that the sky sphere always appears the same, no matter where our camera is located within the scene. To do this, we will be implementing a new shader effect for the skybox rendering, and also a new C# class to encapsulate the skybox geometry and rendering logic. We’ll begin by looking at the HLSL shader code that we’ll use to render the sky sphere.
cbuffer cbPerFrame
{
    float4x4 gWorldViewProj;
};

// Nonnumeric values cannot be added to a cbuffer.
TextureCube gCubeMap;

SamplerState samTriLinearSam
{
    Filter = MIN_MAG_MIP_LINEAR;
    AddressU = Wrap;
    AddressV = Wrap;
};

struct VertexIn
{
    float3 PosL : POSITION;
};

struct VertexOut
{
    float4 PosH : SV_POSITION;
    float3 PosL : POSITION;
};
Our shader constants for this effect consist of a world-view-projection matrix and the cube map texture. This world-view-projection matrix will be constructed from a world matrix, based on the camera’s position, and the camera’s view-projection matrix. We also define a linear texture filtering sampler state object, which we will use to sample the cube map in our pixel shader.
VertexOut VS(VertexIn vin)
{
    VertexOut vout;

    // Set z = w so that z/w = 1 (i.e., skydome always on far plane).
    vout.PosH = mul(float4(vin.PosL, 1.0f), gWorldViewProj).xyww;

    // Use local vertex position as cubemap lookup vector.
    vout.PosL = vin.PosL;

    return vout;
}

float4 PS(VertexOut pin) : SV_Target
{
    return gCubeMap.Sample(samTriLinearSam, pin.PosL);
}
In our vertex shader, we transform the input vertex position into projection space using the global world-view-projection matrix, as normal. After projecting the vertex position, we make use of HLSL’s swizzling feature to discard the projected depth of the vertex, and instead set the z component to the w component, i.e. 1.0f, which forces the skybox to always be considered at the far projection plane. We also output the input vertex position, as we will use it to lookup the appropriate texel from the cube map in our pixel shader. Since the position of the vertex on the sphere is effectively a scaled normal vector radiating from the sphere origin, and the cube-map lookup vector does not care about the magnitude, only the direction, using a sphere for our skybox geometry makes the texture lookup very simple.
RasterizerState NoCull
{
    CullMode = None;
};

DepthStencilState LessEqualDSS
{
    // Make sure the depth function is LESS_EQUAL and not just LESS.
    // Otherwise, the normalized depth values at z = 1 (NDC) will
    // fail the depth test if the depth buffer was cleared to 1.
    DepthFunc = LESS_EQUAL;
};

technique11 SkyTech
{
    pass P0
    {
        SetVertexShader( CompileShader( vs_4_0, VS() ) );
        SetGeometryShader( NULL );
        SetPixelShader( CompileShader( ps_4_0, PS() ) );

        SetRasterizerState(NoCull);
        SetDepthStencilState(LessEqualDSS, 0);
    }
}
The last thing to note about our skybox shader is that we need to set some render states in order to render the skybox correctly. Because we are viewing the sky sphere from the inside, rather than the outside, the winding order on our triangles will be backward, so we need to disable culling. Also, because we explicitly set the sky sphere to render at the far plane, we need to tweak the depth test to LESS_EQUAL, otherwise our skybox geometry will fail the depth test, assuming we clear the depth buffer to 1.0f, as we have been and will continue doing as the first step of our rendering process.
Like all of our effect shaders, we will write a C# wrapper class to encapsulate the details of our shader variables and techniques, and add and instance of this wrapper to our Effects static class. Since this shader is pretty simple, and we have implemented a number of these already, I will omit the wrapper class. If you wish to review the code, check out the Core/Effects/SkyEffect.cs file on GitHub.
Skybox Class
We are also going to write a class to wrap the geometry and cube map texture for a skybox. The primary duties of this class will be to create the vertex and index buffers for our sky sphere, load an environment map from file, and handle drawing the skybox using our skybox shader effect.
public class Sky : DisposableClass {
    private Buffer _vb;
    private Buffer _ib;
    private ShaderResourceView _cubeMapSRV;
    public ShaderResourceView CubeMapSRV { get { return _cubeMapSRV; } private set { _cubeMapSRV = value; } }
    private readonly int _indexCount;
    private bool _disposed;

    public Sky(Device device, string filename, float skySphereRadius) {
        CubeMapSRV = ShaderResourceView.FromFile(device, filename);

        var sphere = GeometryGenerator.CreateSphere(skySphereRadius, 30, 30);
        var vertices = sphere.Vertices.Select(v => v.Position).ToArray();
        var vbd = new BufferDescription(
            Marshal.SizeOf(typeof(Vector3)) * vertices.Length,
            ResourceUsage.Immutable,
            BindFlags.VertexBuffer,
            CpuAccessFlags.None,
            ResourceOptionFlags.None,
            0
        );
        _vb = new Buffer(device, new DataStream(vertices, false, false), vbd);

        _indexCount = sphere.Indices.Count;
        var ibd = new BufferDescription(
            _indexCount * sizeof(int),
            ResourceUsage.Immutable,
            BindFlags.IndexBuffer,
            CpuAccessFlags.None,
            ResourceOptionFlags.None,
            0
        );
        _ib = new Buffer(device, new DataStream(sphere.Indices.ToArray(), false, false), ibd);

    }
    protected override void Dispose(bool disposing) {
        if (!_disposed) {
            if (disposing) {
                Util.ReleaseCom(ref _vb);
                Util.ReleaseCom(ref _ib);
                Util.ReleaseCom(ref _cubeMapSRV);
            }
            _disposed = true;
        }
        base.Dispose(disposing);
    }
    // snip...
}
There is nothing terribly interesting in our initialization/teardown code for the skybox class. We make use of our GeometryGenerator utility class to create the vertices and indices of the skybox, and pull just the position data from the resulting mesh vertex data. Since this class needs to manage D3D Buffers and textures, we subclass it from our DisposableClass base class and follow the standard pattern for releasing DirectX COM resources.
public void Draw(DeviceContext dc, CameraBase camera) {
    var eyePos = camera.Position;
    var t = Matrix.Translation(eyePos);
    var wvp = t * camera.ViewProj;

    Effects.SkyFX.SetWorldViewProj(wvp);
    Effects.SkyFX.SetCubeMap(_cubeMapSRV);

    var stride = Marshal.SizeOf(typeof(Vector3));
    const int Offset = 0;
    dc.InputAssembler.SetVertexBuffers(0, new VertexBufferBinding(_vb, stride, Offset));
    dc.InputAssembler.SetIndexBuffer(_ib, Format.R32_UInt, 0);
    dc.InputAssembler.InputLayout = InputLayouts.Pos;
    dc.InputAssembler.PrimitiveTopology = PrimitiveTopology.TriangleList;
    var tech = Effects.SkyFX.SkyTech;
    for (var p = 0; p < tech.Description.PassCount; p++) {
        var pass = tech.GetPassByIndex(p);
        pass.Apply(dc);
        dc.DrawIndexed(_indexCount, 0, 0);
    }
}
Our draw function requires that we pass in a DeviceContext and a CameraBase. We construct a world matrix for our skybox from the camera’s position and set out shader effect variables. Next we setup our buffers and device properties and render the skybox sphere using the sky shader.
Rendering a Skybox
To add a skybox to one of our demo applications, we simply need to create the skybox in our Init() function, and use the Draw() method of the skybox object at the end of our DrawScene() method. To minimize overdraw, we should always draw the skybox last, as everything else in our scene will pass the depth test over our far-plane skybox pixel, and we will thus waste cycles drawing pixels that will be discarded if we render the skybox early.
public override void DrawScene() {
    ImmediateContext.ClearRenderTargetView(RenderTargetView, Color.Silver);
    ImmediateContext.ClearDepthStencilView(DepthStencilView,
        DepthStencilClearFlags.Depth | DepthStencilClearFlags.Stencil, 1.0f, 0);

    // render everything else...

    _sky.Draw(ImmediateContext, _camera);
    // clear states set by the sky effect
    ImmediateContext.Rasterizer.State = null;
    ImmediateContext.OutputMerger.DepthStencilState = null;
    ImmediateContext.OutputMerger.DepthStencilReference = 0;

    SwapChain.Present(0, PresentFlags.None);
}
 |
| It’s hard to tell from a static screen-shot, but the terrain and sky remain infinitely far away no matter how you move the position of the camera. |
Environmental Reflections
Another similar application of cube maps is for rendering reflections on arbitrary objects. We saw earlier how to render reflections on planar(flat) surfaces, but for rendering reflections on curved or irregular surfaces, the stenciling method presented there falls apart quickly; one would need to process each triangle separately, and in addition to the speed hit you would take in issuing that many draw calls, the effect would probably look wonky. To get truly accurate reflections, one would need to use ray-tracing techniques, which are generally prohibitively expensive to use for real-time rendering. Instead, we can use environment maps, which, while not perfect, provide generally good results for curvy and irregular surfaces.
To add environment mapped reflections to our standard Basic.fx shader, we need to add a TextureCube shader constant, and add the following code to our pixel shader, after we have computed the lit color of a pixel. This also necessitates adding another set of EffectTechniques, similar to those we have already implemented, with reflection enabled.
if( gReflectionEnabled )
{
    float3 incident = -toEye;
    float3 reflectionVector = reflect(incident, pin.NormalW);
    float4 reflectionColor  = gCubeMap.Sample(samAnisotropic, reflectionVector);

    litColor += gMaterial.Reflect*reflectionColor;
}
If we have reflection enabled, we determine the incoming angle to the surface, by inverting the previously computer toEye vector. Next, we compute our cube map lookup by reflecting this incoming view vector using the HLSL reflect intrinsic function about the pixel normal vector, and sample the cube map. We then add the sampled cubemap color, scaled by the object’s material reflectance value, to our computed lit pixel color.
You may recall that when we created our Material structure, way back when we were first covering lighting, that we included a Color4 component Reflect. Up until now, we have not used this property, so it has defaulted to a black color. When using reflection, we will now use this property to control the shade of colors that our surfaces reflect; i.e. we can create a material that only reflects red color by setting the Reflect value to Color.Red.
One limitation of environment mapped reflections like this, is that they do not work all that well for flat surfaces. This is because of the way we sample the cube map to determine the reflected pixel color. If we have multiple flat surfaces, one can observe that the reflection produced for one object viewed at a certain angle will be the same as for all other planar objects viewed from a matching angle. This is because the cube map lookup only takes into consideration the direction of the reflection vector. On curved surfaces, this is not particularly noticeable, since the interpolated pixel normal varies across the surface.
 |
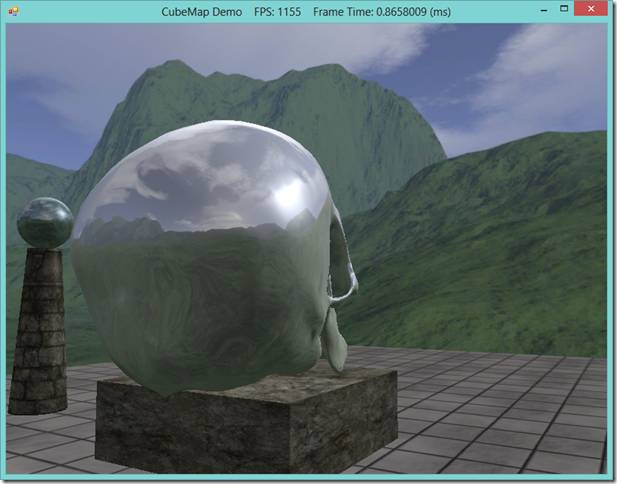
| The skull & columns scene with environment mapped reflections. Note the sun and sky reflected approximately matches the portion of the skybox shown in the previous screenshot. |
Next Steps…
You may have noticed that the reflections we are showing here only include the skybox cubemap. These can be considered static environmental reflections; we do not include the local scene geometry in the reflections, as they are not part of the skybox cubemap. To render the local geometry, we need to dynamically create a cube map from the perspective of each reflective object, by rendering the scene along each axis from the position of the object. This can get very expensive, as we need to render the scene six additional times for each reflective object, but it does allow us to render more realistic reflections. We’ll cover how to do this next time.

