A template for Nancy OWIN Web Apps running as Windows Services
In my day job, we've built out several enterprise applications for interfacing and extending instant messaging platforms, like Microsoft Lync and IBM SameTime. Invariably, we need some kind of web interface for these applications, for configuring settings, displaying metrics, and so forth. Until the past year, we followed the standard pattern, with ASP.NET web applications on top of IIS. In our case, however, there were some pretty serious pain-points that would repeatedly arise:
- Complicated Deployments: The software we sell to our customers is distributed as an installer that they install on servers within their corporate networks. The tooling that we had to build our installers was not always the most powerful, and not well-suited to automatically installing Windows features and IIS roles required for our applications. I've lost track of the number of support calls that I have been on where a customer skipped installing prerequisite components, or missed some of the required IIS roles. Also, having to install an array of IIS roles and features for a very light-weight web application really feels like overkill.
- IIS Configuration Woes: Similarly, because IIS is so configurable, it's easy enough for some of the settings to get twiddled and break our applications. Particularly when one of our applications shares a server or IIS site with other applications (the Lync Server Web UI and SharePoint are common culprits), sorting out the interaction between global IIS settings, site-level settings, and settings for our applications can be needlessly complicated.
- Mismatches between standard IIS behavior and our applications' needs: ASP.NET on IIS is generally oriented around a low-persistence request/response model. Some of our applications have considerable amounts of background processing to perform their work, which doesn't fit this model very well. By default, IIS application pools are set to terminate applications if they have been idle (i.e. not served an HTTP request) in a relatively small amount of time, and also to recycle the application at set intervals. There are ways to get around this behavior, by disabling the idle timeouts and recycling intervals, or employing some other service to periodically ping a keep-alive method on the application. Or you can split the UI component off from the background processing and deploy that as an additional service, but that introduces the complexity of communicating between the two processes and requires installing and configuring an additional service. We've done both, but neither is particularly fun.
Clearly, we were not the only ones to run into these pain-points. Eventually, Microsoft released the OWIN framework, which is much more light-weight and modular web application model than traditional ASP.NET. Along with OWIN came Project Katana, which was the default implementation of OWIN. While OWIN can be integrated into ASP.NET running on IIS, one of the huge selling points of OWIN and Katana is that it makes it considerably easier to create a stand-alone light-weight web server, running out of a Windows Service or even a regular old desktop application.
Running a light-weight stand-alone web server offers a lot of benefits:
- No dependencies on IIS or ASP.NET. All that is required is the .NET Framework, which drastically cuts back on the complexity of checking for and installing prerequisites at deployment.
- Much simpler deployments. Since your application is basically just an .exe, deployments are much simpler, no need to register anything with IIS, setup application pools, or any of that mess. You can go as far as simply zipping up the application directory, unzip it on the target, run the executable, and have a web application up and running.
- Complete control over configuration. Generally with OWIN, all the configuration for your webserver is explicitly configured in code. All of the IIS control panel and web.config fiddling goes away, and you can specify exactly the behaviors expected.
- Application lifecycle is simpler. Your application can service any incoming HTTP requests using the OWIN HttpListener, which works on its own background threads, while your application performs any other processing. There aren't any idle timeouts or automatic recyclings, and your application runs until you decide to stop it.
This all sounds pretty excellent, and in practice it has been a pretty big win for us. However, one difficulty that we encountered was in trying to convert our existing ASP.NET MVC applications over to OWIN self-hosted versions. ASP.NET 5 has been available for some time as a release candidate, and should be available in a final version soon, but at the time that we were first investigating making the switch to OWIN, there was not any version of ASP.NET MVC that could be used with the self-hosted OWIN HttpListener. One option could have been to rewrite our applications to use WebAPI on the back-end and serve static HTML, with JavaScript to load in data from the API, but we had relatively mature applications that followed the MVC way of doing things, populating Razor cshtml files from model classes server-side, and so doing that kind of rewrite and all the necessary regression testing was not particularly attractive.
So we cast about for an alternative that would let us reuse more of our existing code, and came upon the Nancy web framework. While there are some differences in execution, Nancy follows roughly the same conceptual model as ASP.NET MVC, and also provides a view engine with support for Razor cshtml views. It also had a mature and simple-to-use OWIN integration package, so after some experimentation to determine feasibility, we jumped in and started converting over some of our applications, and it has been a great success for us.
With that justification out of the way, I'm going to go ahead a present a very barebones example of how to setup a self-hosted OWIN web application that uses Nancy and runs as either a console application or as a Windows service. The source code is available on GitHub, at https://github.com/ericrrichards/NancyOwinTemplate and you can also download this code as a Visual Studio 2013 project template.
Starting off
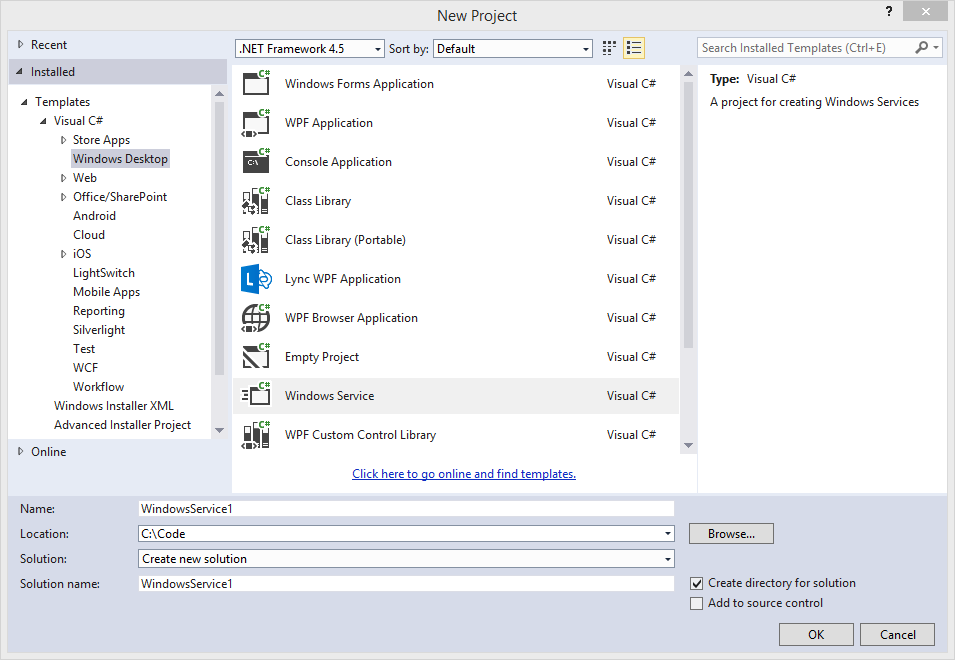
The first step is to create a new Windows Service project in Visual Studio. File->New->Project.
By default, Windows Service projects are set to run as Windows Applications, which means that they don't create a console window. For development and debugging purposes, I find that it is very helpful to have a console window around to dump logging information to, so we are going to open up the project properties and change the project output type to be a Console Application.
Setting up folder structure
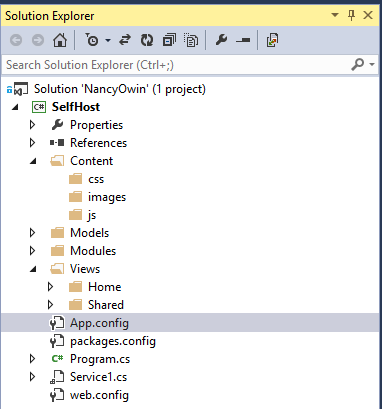
Next, we are going to setup some folders for our application to organize our code and contain our content.
-
Content: Content is something of a "magic" folder for Nancy. All of your static resources, like images, scripts, stylesheets, fonts, etc. are going to live here. By default, Nancy will allow files within the Content folder to be served as static content. You can modify this convention if you want to, but it involves writing some additional code to define those mappings, which I haven't really found to be particularly useful over just using the /Content folder.
- css: Stylesheets go here
- images: Images go here
- js: Javascript files go here
- Models: Put your model classes for your Views here.
- Modules: Modules are the Nancy equivalent of MVC controllers. More on this later.
- Views: By convention, views for Nancy are stored in the /Views folder. By default, this generally follows the same pattern as MVC, but for more details or if you want to use a custom location see here.
Installing NuGet Packages
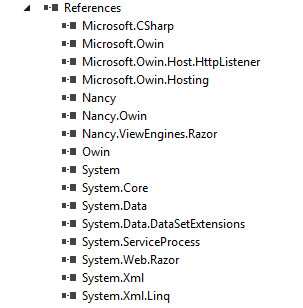
Next, we need to install the necessary OWIN and Nancy NuGet packages. At minimum, you will need to add the following NuGet packages:
- Microsoft.Owin
- Microsoft.Owin.Hosting
- Microsoft.Owin.Host.HttpListener
- Nancy.Owin
- Nancy.ViewEngines.Razor
The Service class
When you created the project, Visual Studio should have created a Service1.cs class, with an empty implementation of a ServiceBase subclass. There should be a basic constructor, and overrides for the OnStart and OnStop methods. Now we need to fill in the code to run our OWIN webserver.
public partial class Service1 : ServiceBase {
    private IDisposable _webhost;
    public Service1() {
        InitializeComponent();
    }

    protected override void OnStart(string[] args) {
        Start();
    }

    protected override void OnStop() {
        if (_webhost != null) {
            _webhost.Dispose();
        }
    }

    public void Start() {
        var startOptions = new StartOptions();
        startOptions.Urls.Add("http://+:80/HelloWorld");
        // If you want to listen on HTTPS as well
        //startOptions.Urls.Add("https://+:443/HelloWorld");
        _webhost = WebApp.Start<Startup>(startOptions);
        Console.WriteLine("Running on http://localhost/HelloWorld");
    }
}
So, what is going on here?
- IDisposable _webhost: This is simply a handle to the OWIN web application that we will create. In many simple examples, the web application will be created via a using block, but where we are planning on as a service, we need to handle the lifecyle of the web application in our OnStart and OnStop methods instead.
- OnStart: Here, we are simply going to delegate our startup logic to the Start function. ServiceBase does not provide an explicit way to start the service, which we will require in order to run the service as a simple console application.
- OnStop: The OnStop method will simply terminate our web application, by Dispose'ing it. Unlike OnStart, ServiceBase does provide an explicit way to terminate a service, via the Stop() method, so we don't need to delegate our shutdown logic to another public function for the purposes of running as a console application.
- Start: This method creates our web application and causes it to start listening on the addresses and ports specified by the values of startOptions.Urls. The Startup class used here as a generic parameter we will cover in the next section.
Defining the OWIN Startup class
OWIN web applications use a Startup class to register and configure any OWIN components that the application uses. This class is expected to have a public void Configuration(IAppBuilder) method. The WebApp.Start<>() function initializes the OWIN pipeline with the configuration specified in this method.
public class Startup {
    // OWIN configuration bootstrapper
    public void Configuration(IAppBuilder app) {
        var listener = (HttpListener)app.Properties["System.Net.HttpListener"];
        // Different authentication methods can be specified for the webserver here
        listener.AuthenticationSchemes = AuthenticationSchemes.Ntlm;
        // If you want to support different authentication methods for different URLs
        // you can use listener.AuthenticationSchemeSelectorDelegate and provide the authentication
        // method for different paths


        app.UseNancy();
    }
}
In our Startup class, we are going to do two things:
-
Configure our application to use NTLM authentication. We do this by grabbing the underlying HttpListener for the application, and setting its
AuthenticationSchemesproperty. For more complicated applications, we can configure different authentication types for different requests by instead implementing anAuthenticationSchemeSelectorDelegate. This can be useful if you have some portions of your site that can be anonymously accessed, vs other areas that require login. -
Add the Nancy OWIN component to the OWIN pipeline by calling
app.UseNancy. This allows requests to be handled by the Nancy modules that we will define.
Main Method
Our project was created with a basic Program class with a Main method. If we were only interested in running our web application as a real Windows service, we could leave that as is. However, it is kind of a pain to try to develop and debug services running this way; in order to execute the service, it needs to be registered with the Windows service manager, and it is relatively irritating to have to manually attach a debugger to the running service, or otherwise resort to logging to a file to check on what the service is doing. So we are going to setup the Main method such that we can launch the service as a regular console application if we provide some command-line arguments to the application.
static class Program {
    static void Main(string[] args) {
        if (args.Length == 0) {
            // run as a service
            var servicesToRun = new ServiceBase[] {new Service1()};
            ServiceBase.Run(servicesToRun);
        } else {
            // run in a console application
            using (var service = new Service1()) {
                service.Start();
                // wait for exit
                Console.WriteLine("Press enter to exit...");
                Console.ReadLine();
                service.Stop();
            }
        }
    }
}
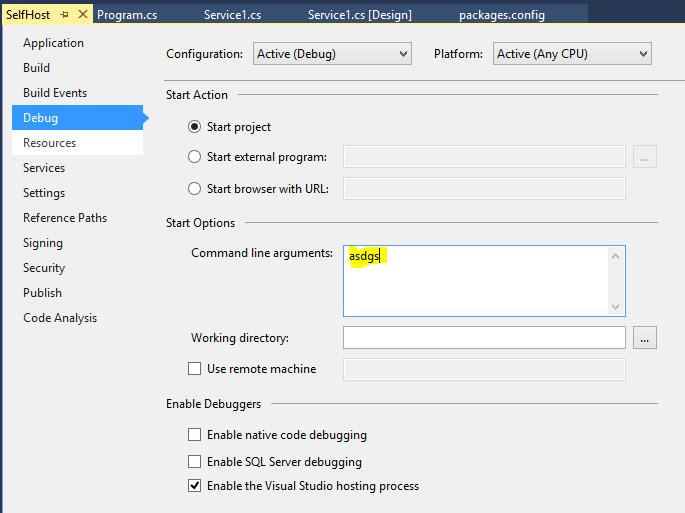
In order to run the program as a console application using the Visual Studio debugger, we need to modify the project properties. Under the Debug tab, you can specify command-line arguments that will be supplied to the application when it is run. For this case, any old random keyboard mashing will do; if your application needs real command-line argument handling, you can use something like Mono.Options and setup a --debug flag or similar.
If you try to run the application now, one of two things will occur:
- The application will pop open a console window, and run until you hit enter.
- The application will crash with a nasty error message. Most of the time, this is because you are not running Visual Studio as an administrator. This is because of security settings in Windows that prevent unelevated programs from using the system-level HTTP drivers. It is possible to add url and port registrations for a particular OWIN application using netsh http add url acl, but the simpler thing is to just run Visual Studio as an administrator.
Great, so we have a self-hosted web server running, but it doesn't really do anything yet. Now we need to wire up some Nancy actions and views that we can hit with a browser.
Creating a Module
Where ASP.NET MVC has Controllers, Nancy has Modules. Conceptually, they are the same idea, although implementing them is slightly different.
Inside the Modules folder of your project, create a new class named HomeModule. Replace the empty class definition with the code below:
public class HomeModule : NancyModule {
    public HomeModule() {
        Get[""] = Get["/"] = Get["/Home/Index"] = HelloWorld;
    }

    private dynamic HelloWorld(dynamic parameters) {
        return View["Index", new ModelBase(Context)];
    }
}
If you are familiar with MVC controllers, this should look relatively familiar. Unlike MVC, which uses reflection to map any public methods that return ActionResults as HTTP routes, Nancy requires that we define our routes explicitly in the Module constructor. We do this by adding values to the dictionaries corresponding to the HTTP method that our routes will use (GET, POST, PUT, DELETE, etc). The keys are the application-relative url routes, and the values are delegates to methods that return content. Nancy has pretty extensive support for defining routes with parameters that can be captured, in a similar fashion to what can be accomplished via the MVC RouteConfig.
The delegates to handle a Nancy route take a DynamicDictionary object and returns the content produced by the method. Nancy will attempt to convert this into an understandable response type, via content-negotiation. The DynamicDictionary parameter will contain any route parameters captured by the route (if the route is defined with capture tokens like /foo/{id}). It is also possible to access any HTTP headers, query string values, response body values, et cetera, via accessing the Context class member, which is populated with values for each request.
In this case, we are simply going to return a view, which we can do by indexing into the View dictionary with the name of the view that we want to return. We can also optionally supply a model object, if our view is expecting a model; in this case the ModelBase class that we will define shortly. Nancy has a default convention for locating views, which is generally the same as that used by MVC.
Adding a model
Now, we need to add the ModelBase class that our module uses. Create a new class in the Models folder of the project, and add the following code:
public class ModelBase {
    protected ModelBase() { }
    public ModelBase(NancyContext context) {
        if (context != null) {
            try {
                var env = ((IDictionary<string, object>)context.Items[NancyMiddleware.RequestEnvironmentKey]);
                User = (IPrincipal)env["server.User"];
            } catch (Exception ex) {
                // log error
            }

        } else {
            // log warning
        }
    }
    public IPrincipal User { get; private set; }
}
The purpose of this model is to give us information about the authenticated user accessing the page, similar to the User property that is available to MVC views. In theory, it looks like Nancy has a Context.CurrentUser property that should provide similar functionality out-of-the-box, but I have never been able to get it to work properly.
Now that we have a module and a model, the last piece of the puzzle is to create a view.
Adding Views
First we'll create a very simple common layout that our views can reuse. So, in the Views/Shared folder of the project, create a new Razor view named _Layout.cshtml, and add the following code:
<!DOCTYPE html>

<html>
<head>
    <title>@ViewBag.Title</title>
</head>
<body>
<div>
      @RenderBody()
</div>
</body>
</html>
So far, this is exactly the same as what you would have in a similarly simple MVC layout view.
Next, we'll create the Home/Index view, inside of Views/Index. This one is a little different from what you would see in an MVC project.
@inherits Nancy.ViewEngines.Razor.NancyRazorViewBase<SelfHost.Models.ModelBase>

@{
    Layout = "Views/Shared/_Layout.cshtml";
    ViewBag.Title = "Hello World";
}

<h2>Hello @Model.User.Identity.Name!</h2>
The Nancy Razor view engine is similar, but not identical to the view engine for MVC. In my experience, it is a little less fully-featured, particularly its HtmlHelper implementation. If you rely heavily on the markup generating methods of the MVC HtmlHelper, you may be a little disappointed with Nancy, but I tend to be using a front-end framework like Bootstrap which doesn't necessarily play nicely with HtmlHelper anyway, so your mileage may vary.
The first major difference you should notice is that instead of the @model foo syntax that MVC uses to define the model type used by the view, Nancy uses @inherits Nancy.ViewEngines.Razor.NancyRazorViewBase<fullQualified.foo>. If you use ReSharper or other refactoring tools, they may tell you that the Nancy.ViewEngines.Razor portion of this declaration is redundant - ignore that, as the Nancy view engine will barf up with a delightful The Oatmeal-themed error page if this type is not fully-qualified.
Next, you should see that we explicitly set the Layout property of the view. Older versions of the Nancy Razor view engine did not support MVC style _ViewStart.cshtml, so it was necessary to set the Layout for each view that used one. This may have changed in newer versions of the library, but I have gotten into the habit of always explicitly specifying.
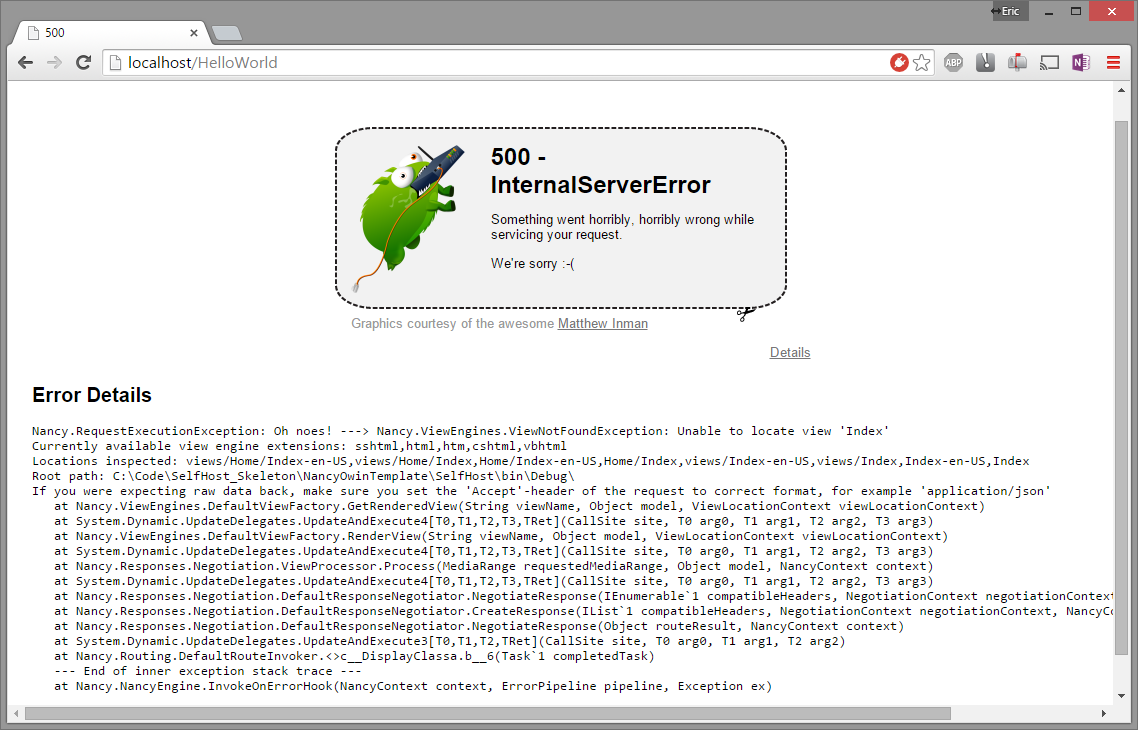
Cool, now we have some views. Let's try to run it!
The hell? Our view is missing? But it looks like the paths that Nancy looked in to find the view included the folder where we put it...
Nope... Root path: C:\Code\SelfHost_Skeleton\NancyOwinTemplate\SelfHost\bin\Debug\
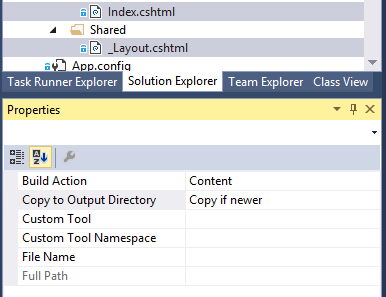
Unlike using MVC on IIS, if you are running a self-hosted OWIN web application from Visual Studio, the current working directory for the program will be \bin\[Debug|Release] when it is executing. So the views are indeed missing. The easiest way to fix this is to select your views, open the properties window, and set the Copy to Output Directory property to Copy if newer.
This will copy your views over into the output directory (/bin/Debug) when you build the project. This is kind of a pain, since you have to set this property on each new file that you add, and the same thing applies for static content in the /Content folder. There doesn't seem to be a way to set the property on the containing folder to recursively apply to its contents, which seems like a bit of an oversight. For production code, I usually setup a Grunt task to watch these directories and automatically copy over any new or modified files.
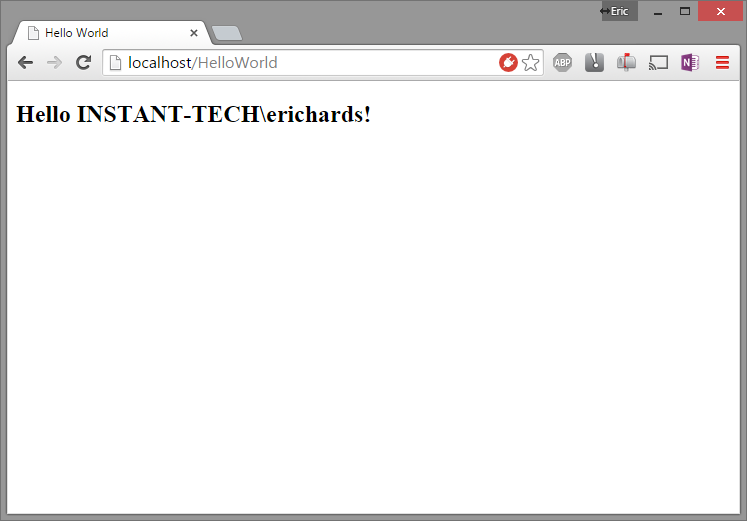
With that hurdle overcome, we can run the code again and see the fruits of our labor. Glorious!
Recapping
So, here we have a very barebones, but functional, MVC web application, running out of a simple executable, with no dependencies on IIS. We could simply xcopy it to deploy, and run with arguments as a console application, or we could register it as a Windows service. Outside of the .NET Framework, we don't need any external dependencies, and it weighs in at about 1.5 MB.
Things get a little more complicated when you are trying to convert a more extensive ASP.NET MVC application over to be self-hosted and use Nancy, but I've found the benefits of decoupling from IIS deployment and configuration headaches more than make up for it. Also, we didn't get too deeply into it in this installment, but I've also found that getting away from some of the more magical aspects of MVC, which are primarily legacies of trying to shoe-horn it into the legacy ASP.NET framework, makes the codebase much simpler and easier to understand - think things like RoleProviders, RouteConfig, BundleConfig, and all the web.config hell that ASP.NET brings along.

