
Hello Raytracing
Whew, it's been a while...
A few weeks ago, I happened across a new book by Peter Shirley, Ray Tracing in One Weekend. Longer ago than I like to remember, I took a computer graphics course in college, and the bulk of our project work revolved around writing a simple ray tracer in Java. It was one of the few really code-heavy CS courses I took, and I really enjoyed it; from time to time I keep pulling down that old project and port it over to whatever new language I'm trying to learn. One of the primary textbooks for that course was Fundamentals of Computer Graphics, aka "the tiger book," of which Mr. Shirley was also an author. Since that's one of the more accessible graphics textbooks I've encountered, I figured this new offering was worth a look. It didn't disappoint.
Ray Tracing in One Weekend is, true to its title, a quick read, but it packs a punch in its just under 50 pages. Even better, it's running at around $3 (or free if you have Kindle Unlimited). I paged through it in a couple of hours, then, as I often do, set about working through the code.
If you want to follow along, I've put my code up on Github, although it's still a work in progress; we're wrapping up a new release at the day job and so I've not had a huge amount of time to work on anything extra. Fortunately, each example I'll be doing here is pretty self-contained, and so all of the code will be up here. We'll start at the beginning, with a simple Hello World a la raytracing.
Hello World
PPM Image Format
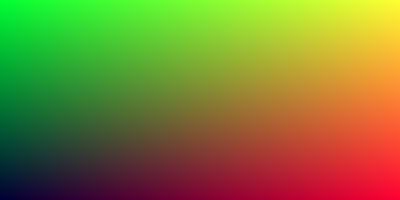
The bulk of this first chapter deals with creating an image in the PPM format. This is a really simple, raw image format, which, while it doesn't have any nice space-saving features like compression or run-length encoding, is super easy to create, and relatively human-readable. It consists of a very simple header, and then plain-text RGB triplets. Here's an excerpt from the image above:
P3
400 200
255
0 254 51
0 254 51
1 254 51
1 254 51
2 254 51
3 254 51
The P3indicates that the image is in the Portable PixMap (PPM) format, which is a 24-bit color format. There are other image formats in this family, like P1 for Portable BitMap (PBM), which is a black-and-white format, P2, for Portable GrayMap (PGM), which is eight-bit gray-scale, and P4 (PBM), P5 (PGM), and P6 (PPM), which encode their pixel values in binary, instead of ASCII.
The second line is a tuple with the width and height of the image in pixels. So in this case, the full image is 400x300 pixels.
The third line indicates the maximum range of the pixel color channel values. In this case, we're using 24-bit color, with 8 bits per channel, so the maximum range is 255. According to the spec, you could use anything between 1 and 2^16, although I've no idea how widely that is supported in any image viewers you might try to use to open such an image. 3x8 RGB maps pretty directly to regular bitmap (BMP) images, and we've all gotten pretty used to dealing with that color space, due to hex colors and CSS, so that's what we'll use.
Lastly, we've got the actual pixel information itself. I've only copied in a small sample, just enough to get the idea. Each line consists of a 8-bit RGB triplets, in ASCII. These samples should go in order, row by row, left-to-right - thus the first triplet is the top-left pixel of the image, and the last triplet in the file is the bottom-right. Technically, you don't have to put each pixel triplet on its own line, as it is here; as long as there is some kind of white-space character between the color channels, you're good. According to the spec for the P3 format, all the lines in the file should be 70 characters wide or less - an artifact of 80-character wide terminal displays back in the day, and before that, 80-character IBM punchcards back in the mists of history.
Anyway, that's enough about image formats. Let's get on to writing some code to produce that image above.
Ray tracing!
Here, in all its glory, is the complete program to generate the image above.
using System.Diagnostics;
using System.IO;
using System.Text;

namespace OneWeekendRT {
    public class HelloWorld {

        public static void Main(string[] args) {
            var width = 400;
            var height = 200;

            var sb = new StringBuilder();
            // add PPM header
            sb.AppendLine("P3"); // ASCII PPM
            sb.AppendLine(width + " " + height); // Image dimensions
            sb.AppendLine("255"); // Max color range

            for (var y = height - 1; y >= 0; y--) {
                for (var x = 0; x < width; x++) {
                    var r = (float)x / width;
                    var g = (float)y / height;
                    var b = 0.2f;
                    // convert float colors to bytes
                    var ir = (int)(256 * r);
                    var ig = (int)(256 * g);
                    var ib = (int)(256 * b);
                    // Add RGB triplets
                    sb.AppendLine(ir + " " + ig + " " + ib);
                }
            }
            File.WriteAllText("hello.ppm", sb.ToString());
            Process.Start("hello.ppm");
        }
    }
}
There's probably ways to optimize this better than building the whole text of the file up in a StringBuilder, but for this case, it's plenty fast enough, and it's dead simple.
So here's what we're doing in broad strokes:
- Declare our image dimensions,
widthandheight - Declare our buffer
sbthat we're going to build up the image into. - Write out the PPM image header, as we discussed above.
- Next, we start looping over the pixels in the image. Our outer loop loops over the rows in the image, while the inner loop loops over the columns in each row. Inside our inner loop, we determine the color of each pixel:
- We're just doing a simple red-green gradient, so we divide the loop indices by the width and height, for the red and green channels, keeping the blue channel constant.
- Then we need to convert these floating-point colors to byte values, so we multiply them by 256 and truncate them to integral values.
- Last, we write the integer color values out as RGB triplets.
- After we've looped over all our pixels, we write the resulting buffer out to file.
-
Finally, we open up the image by using
Process.Start(). If you don't have an image viewer registered to open PPM images, this probably won't work for you. I use IrfanView, which handles all kinds of the less common image formats.
And there we have it!
Next up, we'll build out a basic 3D vector class, which will make manipulating our color values easier, as well as being very useful for when we get into actual ray tracing in subsequent chapters.