
HLSL Cookbook: Hemispherical Ambient Lighting
Well, it's been two rough months since the last post. Work has been crazy, and I've been wrestling with finishing up my never-ending Voronoi mapping project. So I decided to switch gears and return to the HLSL Development Cookbook. Now that I've got code in place to handle loading the .sdkmesh model files used by the book's examples, the hardest part is done. Now it is just a matter of converting plain HLSL vertex and pixel shaders over into the Effects Framework format I've been using, and porting the DXUT C++ code over to C# and my SlimDX application framework.
The first chapter of the HLSL Development Cookbook covers classic forward lighting, which is the style of lighting that we have used throughout the examples posted here thus far (see Directional, Point and Spot lights and three-point lighting). Later, the book covers some more complicated lighting schemes, but we'll get to that in due time.
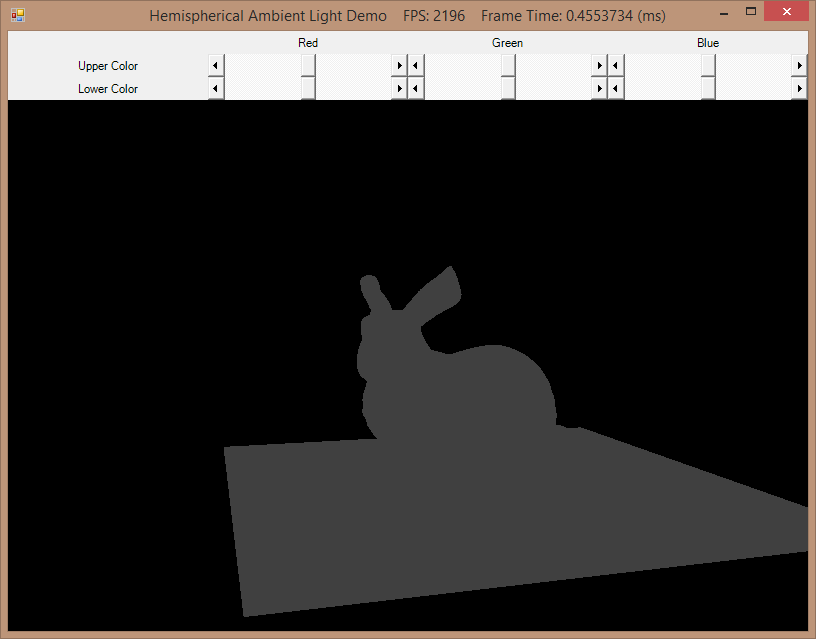
Up first on the slate is ambient lighting. If you've been reading along with my posts, you may recall that we briefly discussed ambient lighting when defining our Light and Material classes. Ambient lighting is something of a hack that was invented to fake the effect of indirect lighting (light that hits a surface after bouncing off one or more other surfaces) without having to actually perform the computations to model the light rays. Historically, back in the days before programmable shaders, this ambient lighting was expressed as constant color values for the lights and materials in the scene being rendered. So far, I have followed this simple scheme in the shaders I adapted from Frank Luna's Introduction to 3D Game Programming with Direct3D 11.0. As you can see in the screenshot on the left below, this method results in a flat ambient color, which conceals the surface details of the mesh. Combined with the diffuse and specular terms in the traditional Phong reflection equation, this method works well, but on its own it is underwhelming.
HLSL Development Cookbook presents an alternative method of calculating ambient lighting, called hemispheric ambient lighting. This method takes advantage of programmable pixel shaders, and allows us to calculate a varying ambient color per pixel, based on the interpolated surface normal and two constant color values representing the color of light that is bounced off the ground and off the ceiling/sky. As you can see in the screenshot on the right below, this lighting method preserves the surface details of the mesh (so long as different colors are selected for the top and bottom colors). As we'll see, this method of computing ambient lighting is also pretty cheap to do computationally.
 |
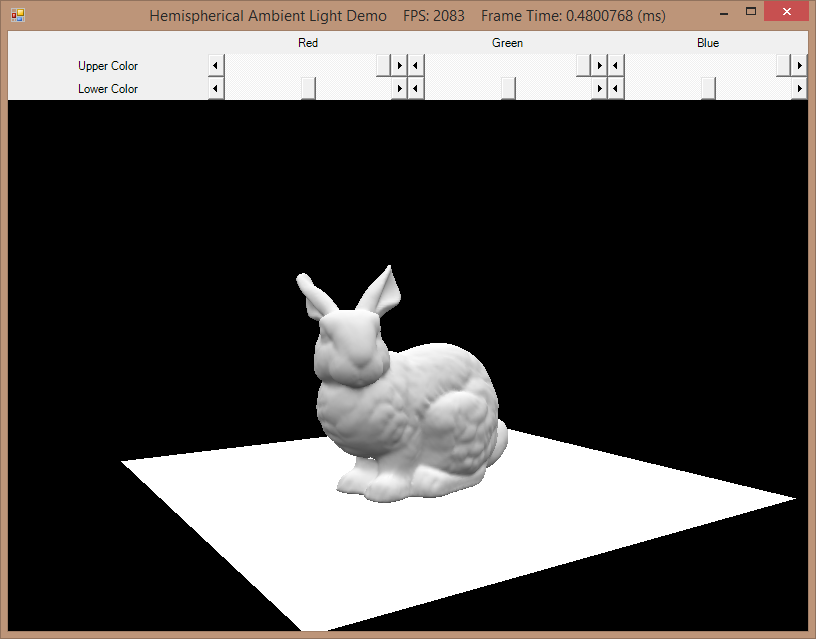 |
| Old-style flat ambient lighting | Hemispherical ambient lighting |
As always, the full source code for this post is available at my github repository.
Converting the HLSL Shaders to Effect Framework
In the original sample code for the book, the HLSL shaders used in the examples are written in pure HLSL. So far, I have been using the Effects library, which is a slightly higher-level abstraction. In my opinion, using the Effects library is a little simpler than binding vertex and pixel shaders, along with the various texture samplers and other state in code, and I have a relatively robust framework already constructed to deal with Effects, based on my work with Luna's book. Note that this may not be the recommended path for really serious DirectX programming, and support for the Effects library is not guaranteed in future versions of DirectX, but for my purposes, I have not run into any issues, and SlimDX has good support for Effects. With that caveat out of the way, let's take a look at the mechanics of converting pure HLSL shaders to the format used by the Effects library.
In the code listings below, I'm going to show my .fx code on the left, with the corresponding .hlsl fragments from the original sample code on the right. Any significant differences will be highlighted in bold.
We'll start by defining our constant buffers, global variables, and shader input/output structure. Refer to FX/ForwardLight.fx
cbuffer cbPerObject { float4x4 WorldViewProjection; float4x4 World; float4x4 gWorldInvTranspose; }; cbuffer cbDirLightPS { float3 AmbientDown; float3 AmbientRange; }; Texture2D DiffuseTexture; SamplerState LinearSampler { Filter = MIN_MAG_MIP_LINEAR; AddressU = WRAP; AddressV = WRAP; AddressW = WRAP; MaxAnisotropy = 1; }; struct VS_INPUT { float3 Position : POSITION; float3 Normal : NORMAL; float2 UV : TEXCOORD0; }; struct VS_OUTPUT { float4 Position : SV_POSITION; float2 UV : TEXCOORD0; float3 Normal : TEXCOORD1; }; |
cbuffer cbPerObjectVS : register( b0 ) { matrix WorldViewProjection : packoffset( c0 ); matrix World : packoffset( c4 ); } cbuffer cbDirLightPS : register( b1 ) { float3 AmbientDown : packoffset( c0 ); float3 AmbientRange : packoffset( c1 ); } Texture2D DiffuseTexture : register( t0 ); SamplerState LinearSampler : register( s0 ); struct VS_INPUT { float4 Position : POSITION; float3 Normal : NORMAL; float2 UV : TEXCOORD0; }; struct VS_OUTPUT { float4 Position : SV_POSITION; float2 UV : TEXCOORD0; float3 Normal : TEXCOORD1; }; |
The first thing that you may notice is that we are not going to bother manually specifying the register slots and packing offset. The Effects library performs shader reflection for us, which allows us to set our constant buffers and other resources through a higher-level interface, which does not require us to know exactly which GPU registers these resources are stored in. Therefore we can simply allow the Effects compiler to automatically assign storage for our constant buffers and resources.
-
cbPerObject - This constant buffer contains constants that vary for each model that we draw.
- WorldViewProjection - The world matrix of the model, multiplied by the camera view and projection matrices.
- World - The world matrix of the model, used to transform the object-space vertex positions of the model into world-space.
- gWorldInvTranspose - The inverse transpose of the model's world matrix. This will be used to transform the vertex normals of the model from object-space to world-space. Using the world inverse transpose matrix offers us the advantage of being able to correctly transform normals for objects that have non-linear scaling transforms (i.e. stretching a model to make it taller/fatter), or shearing transforms, which simply using the World matrix would not correctly transform.
-
cbDirLightPS - This constant buffer contains lighting parameters that will stay constant for an entire frame.
- AmbientDown - This is the color of ambient light reflecting off of the ground/floor. A downward facing surface (Normal of [0, -1, 0]) will be this color.
- AmbientRange - This value contains the difference between the ambient light color reflecting from the sky/ceiling and the AmbientDown light color. We use this instead of simply the upper ambient light color because of an optimization we can make by rearranging the linear-interpolation equation, as we'll see shortly when we discuss the pixel shader.
- DiffuseTexture - The diffuse texture for the model.
- LinearSampler - This is the texture sampler that we will use to sample the diffuse texture. The effects library allows us to specify all of the state information for samplers in shader code, which eliminates some tedious boiler-plate code in our main (C#) application code.
- VS_INPUT - This is the vertex structure that we will input to our vertex shader. Because of the vertex format that I am using for my model-loading code, I needed to change the original 4-component position vector to the 3-component vector my models use. Otherwise, this is pretty standard stuff, with a normal vector and 2D texture mapping coordinate.
- VS_OUTPUT - The vertex structure that will be emitted from our vertex shader, interpolated and passed to the pixel shader. Again, nothing special here.
Next come the vertex and pixel shaders themselves.
VS_OUTPUT RenderSceneVS(VS_INPUT input) {
    VS_OUTPUT output;
    float3 vNormalWorldSpace;
    output.Position = mul(float4(input.Position, 1.0f), WorldViewProjection);
    output.UV = input.UV;
                output.Normal = mul(input.Normal, (float3x3)gWorldInvTranspose);
                return output;
}
float3 CalcAmbient(float3 normal, float3 color) {
                float up = normal.y * 0.5 + 0.5;
    float3 ambient = AmbientDown + up * AmbientRange;
                return ambient * color;
}
float4 AmbientLightPS(VS_OUTPUT input) : SV_TARGET0{
                input.Normal = normalize(input.Normal);
    float3 diffuse = DiffuseTexture.Sample(LinearSampler, input.UV).rgb;
    diffuse *= diffuse;
    float3 ambient = CalcAmbient(input.Normal, diffuse);
                return float4(ambient, 1.0);
}
|
VS_OUTPUT RenderSceneVS( VS_INPUT input ) {
    VS_OUTPUT Output;
    float3 vNormalWorldSpace;
    Output.Position = mul( input.Position, WorldViewProjection );

    Output.UV = input.UV;
    Output.Normal = mul(input.Normal, (float3x3)World);

                return Output;
}
float3 CalcAmbient(float3 normal, float3 color) {
                float up = normal.y * 0.5 + 0.5;
    float3 ambient = AmbientDown + up * AmbientRange;
                return ambient * color;
}
float4 AmbientLightPS( VS_OUTPUT In ) : SV_TARGET0 {
    float3 DiffuseColor =  DiffuseTexture.Sample( LinearSampler, In.UV ).rgb;
    DiffuseColor *= DiffuseColor;
    float3 AmbientColor = CalcAmbient(In.Normal, DiffuseColor);
                return float4(AmbientColor, 1.0);
}
|
- RenderSceneVS - This is pretty much a bog-standard vertex shader. As mentioned earlier, we use the world-inverse-transpose matrix to transform normals, rather than the straight world matrix, in order to support non-uniform transforms.
-
CalcAmbient - Here is where we do our ambient lighting calculations.
- Take the y-component of the normal vector, and remap it from [-1, 1] to [0, 1], so that we can use it as a linear interpolation factor.
-
Calculate the ambient light color by linear interpolating between the ground ambient color and the sky ambient color. This makes use of a rearranging
of the standard linear interpolation equation:
DownColor * (1-up) + UpColor = DownColor + up * (UpColor - DownColor)Hence why we are storing the AmbientRange in our constant buffer, which is equal to the term (UpColor-DownColor) in the equation above.
- Return the ambient color scaled by the sampled diffuse map color.
- AmbientLightPS - Again, a fairly simple pixel shader. The only thing of note here is that the original did not bother to normalize the input normal vector. For the original sample, this was not an issue, as they did not use any world-transformation matrix on their model, but I had an interesting time figuring out why I was seeing significantly darker colors in my example, when using a scaled-down model.
The last bit we need to look at is unique to my .fx shader code. This is the effect technique definition. The Effects library allows one to easily define rendering techniques, using one or more rendering passes, and handles binding whatever shaders and states are defined for the pass with a single call.
technique11 Ambient {
    pass P0 {
        SetVertexShader(CompileShader(vs_5_0, RenderSceneVS()));
        SetPixelShader(CompileShader(ps_5_0, AmbientLightPS()));
    }
}
Shader Wrapper Class
As with our other shader effects, we will create a C# wrapper class for our ambient lighting HLSL effect, based on my Core.Effect class. For the moment, I'm not going to add it to our Core set of Effect subclasses, and instead keep it in the same project as the demo application, at least until I finish working though the entire chapter of examples.
If you have seen any of my previous effect wrapper classes, this should come as no surprise. We have a set of EffectXXXVariable handles to reference the shader constants defined in our .fx file. We assigns these handles in the ForwardLightingEffect constructor, using the shader reflection methods built-in to SlimDX. We also provide a set of setter methods to bind values to each shader variable.
public class ForwardLightingEffect : Effect {
    // per object variable
    private readonly EffectMatrixVariable _worldViewProj;
    private readonly EffectMatrixVariable _world;
    private readonly EffectMatrixVariable _worldInvTranspose;
    // scene variables
    private readonly EffectVectorVariable _ambientDown;
    private readonly EffectVectorVariable _ambientRange;
    // per subset diffuse texture
    private readonly EffectResourceVariable _diffuseMap;
    // ambient effect technique
    public readonly EffectTechnique Ambient;
    public ForwardLightingEffect(Device device, string filename) : base(device, filename) {
        Ambient = FX.GetTechniqueByName("Ambient");
        _worldViewProj = FX.GetVariableByName("WorldViewProjection").AsMatrix();
        _world = FX.GetVariableByName("World").AsMatrix();
        _worldInvTranspose = FX.GetVariableByName("gWorldInvTranspose").AsMatrix();
        _ambientDown = FX.GetVariableByName("AmbientDown").AsVector();
        _ambientRange = FX.GetVariableByName("AmbientRange").AsVector();
        _diffuseMap = FX.GetVariableByName("DiffuseTexture").AsResource();
    }
    public void SetWorldViewProj(Matrix m) {
        _worldViewProj.SetMatrix(m);
    }
    public void SetWorld(Matrix m) {
        _world.SetMatrix(m);
    }
    public void SetWorldInvTranspose(Matrix m) {
        _worldInvTranspose.SetMatrix(m);
    }
    public void SetAmbientDown(Vector3 v) {
        _ambientDown.Set(v);
    }
    public void SetAmbientRange(Vector3 v) {
        _ambientRange.Set(v);
    }
    public void SetDiffuseMap(ShaderResourceView tex) {
        _diffuseMap.SetResource(tex);
    }
}
Demo Application Code
Our demo application for this project is pretty simple; all we're going to do is render a mesh (the Stanford Bunny) with our ambient lighting effect. We'll provide some simple Windows Forms controls to modify the upper and lower ambient color terms at runtime. This demo uses my application framework base class, a look-at camera, and my SDKMesh model loader.
The bulk of the code for this example is identical to all of the other examples on this site, so I am going to skip right to the rendering callback, DrawScene().
public override void DrawScene() {
    base.DrawScene();
    ImmediateContext.ClearRenderTargetView(RenderTargetView, Color.Black);
    ImmediateContext.ClearDepthStencilView(DepthStencilView, DepthStencilClearFlags.Depth, 1.0f, 0);
    ImmediateContext.InputAssembler.InputLayout = InputLayouts.PosNormalTexTan;
    ImmediateContext.InputAssembler.PrimitiveTopology = PrimitiveTopology.TriangleList;
    _camera.UpdateViewMatrix();

    var view = _camera.View;
    var proj = _camera.Proj;
    SetupAmbient();
    var activeTech = _effect.Ambient;
    for (var p = 0; p < activeTech.Description.PassCount; p++) {
        var pass = activeTech.GetPassByIndex(p);
        _bunnyInstance.Draw(ImmediateContext, pass, view, proj, DrawAmbient);
    }
    SwapChain.Present(0, PresentFlags.None);
}
Here, we perform our normal setup before rendering the frame, clearing the depth and render target buffers, setting the input layout and primitive topology, and updating the camera view matrix.
Next, we'll setup the ambient lighting shader constants for our effect in the SetupAmbient() function, which we'll discuss more below.
Then, we draw the bunny model, using our ambient lighting technique, and present the backbuffer. If you have seen other examples that make use of my Model classes, you'll notice that we are using a new overload of the Draw() function here, which accepts as a final parameter a function to perform custom rendering code. As I'm not sure where I will end up going with my rendering code for the HLSL Development Cookbook yet, I don't want to bake any extra functionality into my Core Model classes, so I've gone this route of using a callback to perform application-specific rendering methods.
SetupAmbient Function
private void SetupAmbient() {
    _effect.SetAmbientDown(_ambientLower);//lowerGamma);
    _effect.SetAmbientRange(_ambientUpper - _ambientLower); //range);
}
The SetupAmbient() function sets up the two ambient color values and assigns them to our shader effect. If you recall, in our shader, we use the ambient color originating from the ground (_ambientLower), and the difference between the upper (sky) ambient color (_ambientUpper), and the lower ambient color, which we'll refer to as the ambient range. An interesting wrinkle here is that the original code used a function to gamma-correct the colors sent to the shader; however, the only way that I was able to reproduce the same colors in my demo was to ignore the gamma-correction step, and use the unmodified ambient color values.
Custom Rendering Callback
For the purposes of this demo, I did not want to substantially modify my core Model classes to add a new rendering path for the ambient lighting effect. The way that I decided to talke this was to add a new Draw overload on my IModel base class, which allows rendering using a custom callback. This callback requires parameters for the Direct3D DeviceContext, the current EffectPass, and the view and projection matrices, which is essentially the method signature of my built-in rendering methods. This allows me to write application-specific custom rendering code for whatever new effects I create without impacting my core engine code.
public delegate void ModelDrawDelegate(DeviceContext dc, EffectPass pass, Matrix view, Matrix proj);
public void Draw(DeviceContext dc, EffectPass effectPass, Matrix view, Matrix proj, ModelDrawDelegate method) {
    method(dc, effectPass, view, proj);
}
With that change made to the Core.IModel class, we can write a custom rendering callback to easily use our ambient lighting technique, RenderAmbient().
private void DrawAmbient(DeviceContext dc, EffectPass pass, Matrix view, Matrix proj) {
    var model = _bunnyInstance.Model;
    var world = _bunnyInstance.World;
    var wit = MathF.InverseTranspose(world);
    _effect.SetWorld(world);
    _effect.SetWorldViewProj(world * view * proj);
    _effect.SetWorldInvTranspose(wit);
    for (var i = 0; i < model.SubsetCount; i++) {
        _effect.SetDiffuseMap(model.DiffuseMapSRV[i]);
        pass.Apply(ImmediateContext);
        model.ModelMesh.Draw(ImmediateContext, i);
    }
}
Ambient Lighting!
Next Time...
Gah, I hope I get back to this before another two months go by... Wrapping up my Voronoi mapping code is turning into a year-long slog, although I am fortunately at the point where I am just cleaning up and commenting it, in preparation of writing it up as a post here. Although it's complicated enough that it may warrant a series of posts, to adequately explain it and keep me from feeling overwhelmed.
Additionally, now that I've gotten over the hurdle of doing the first post from the HLSL Development Cookbook, the next few should be considerably quicker to work through. I've got the infrastructure underneath me now to focus on the actual rendering code. So expect some upcoming posts on directional, point, spot and capsule lights. I'm looking forward to reaching the second chapter, on deferred shading, which will be something I haven't done at all yet.